RED WINE FROM GRAPE TO BOTTLE.
Hello and welcome. I would first like to thank BCAWA for
inviting me to speak today. I wasn’t very long ago that I was sitting where you
are so I am very flattered that you have asked me here today. I know most of you
will know a lot of this material but I know there are some that don’t, so
hopefully I can pass on a new idea or two.
I would like to go though a vintage of red
wine production the way we do it at Pacific Breeze and pass on some of the ideas
we have learned over the last few years. It is quite a jump from making 200
liters of wine to 30,000 liters. Three concepts we use is first and foremost,
CLEANLINESS, second PRE-PLANNING AND
ORGANIZATION, and third DOCUMENTATION AND KEEPING
ACURATE RECORDS.
Before we get into the actual grapes arriving
there is a lot of cleaning and planning to do. We usually start looking at what
grapes we want and although we have contracts we still need to know how much and
which varieties we plan to make. When I was the grape liaison for the Vintners
of Coquitlam I would start looking for grapes in the spring and ask our members
to start thinking about what they wanted to make. That was like pulling teeth.
The old adage the early bird gets the worm is true. You will get the best grapes
if you order ahead and not the week before harvest. The growers need to know
what you want so they can insure that you will get your grapes. Now you know how
much and what varieties you are going to make so now you can insure you will
have tank and fermenter space available. Now you can start planning your
vintage.
First I make sure that all my wines from the
previous year are all racked and SO2’s are topped up. The last thing you need is
to try and rack wines when you are crushing the new vintage. Now that you know
how many lbs of red grapes you are purchasing its time to order all of your
fermentation supplies. I usually start doing this in early August. One of big
things I have learned over the last 5 years is the use of the metric system. I
know some of you probably use it, but I still hear people talking in gallons and
teaspoons per gallon and so on. The metric system makes additions and
calculations very simple. So the thing you need to know is how many liters of
wine you will get from your grapes. It does depend on your grapes and your
equipment; however we use the formula of 600 liters per ton of grapes. So a
simple calculation would be to multiply 2000 lbs X .30 = 600 liters. You can now
use that .30 and multiply it by whatever amount of lbs of grapes you have and it
will give you an amount in liters. For example 500 lbs X .30 = 150 liters. Now
if your equipment and grapes give you different yields you can change the
multiplier to suit your estimated volume but the key here is to know how many
liters of wine you have at the crush and estimated wine at the press, because
all of your additions of SO2, color enzymes nutrients yeasts and so on are all
calculated in grams per liter or grams per hectoliter. G/L or G/HL. Now to find
out how many hectoliters you have, you simply move the decimal place two spaces
to the left and your 150 liters becomes 1.5 HL. A hectoliter is 100 liters.
This calculation now makes it easy to go ahead
and order all of your fermentation supplies for the new vintage. I suggest you
throw out all of your old supplies as most of them do not keep very well.
However things like diversol, citric and tartaric acids should be fine, but the
rest you should order new. This way you won’t have much left over next year so
there will not be a lot of waste. I suggest you keep each different product in a
clean and sealable Tupperware or Rubbermaid container labeled with the name of
the product.
So now you can make up a list of all your
supplies and order and purchase them ahead of time. This will insure you will be
prepared for your vintage when your grapes arrive. You should also purchase a
high quality and accurate gram scale that is capable of weighing down to 1/10 of
a gram. To successfully learn this metric system you need a proper scale to make
these measurements. So often I get asked how many teaspoons of yeast is 1 gram,
and I always say a teaspoon of yeast may not weigh the same as a teaspoon of
Fermaid K. So get a proper scale to insure all of your additions are accurate.
This is how I go about making an order list
for my vintage. I will use the 150 L or 1.5 HL for the example. This is for 500
lbs of red grapes.
Yeast @ 35 GPHL
35 x 1.5 = 52.5 grams
Go-Ferm @ 43 GPHL 43 x 1.5
= 64.5 grams
Rapidese Color Enzyme @ 3 GPHL
3 x 1.5 = 4.5 grams
Fermaid K @ 25GPHL 25 x 1.5 =
37.5 grams
VR-Supra Tannin @ 20 GPHL
20 x 1.5 = 30 grams
DAP @ 20 GPHL 20 x 1.5 = 30 grams
( If needed)
I also order enough Christian Hansen ML
bacteria and Leucofood for the entire vintage as well as a good supply of
Potassium Meta-bisulphite, Diversol and citric acid for cleaning and sanitizing,
a good supply of tartaric acid in case acid additions become necessary due to
high PH grapes. Also some new NAOH at .1N and .01N and
phenolthaline for acid titrations, and PH 4 and 7 buffers for calibrating your
PH meter. Be sure to keep your Christian Hansen ML bacteria in the freezer until
you are ready to use it. Also keep distilled water in your lab for rinsing you
PH meter probe.
I also order enough chromatography paper,
pipettes and solvent for doing chromatography after ML is complete. If you do
not do this I offer some testing at the winery for a price. Just contact me for
a list of tests and prices.
Now that you have fully stocked your cellar
with all the supplies you will require as well as any other product you might
use you are ready for the up and coming vintage. Usually about a week before the
grapes are due to arrive you should go ahead and clean all of your equipment.
Tanks, carboys, lab equipment.. As I mentioned before cleanliness is so
important to insure great wine. Remember your wine is only as clean as the
dirtiest thing it has touched.
We use diversol for cleaning, mixed in about
140F or 60C hot water, brushing where possible then rinsing with 140F hot water
and then sanitizing with citric acid and hot water, then a final rinse of 140F
hot water. Addition rates are about 80 grams of diversol/citric acid per 23
liters of hot water. In the winery we use the 4 bucket method. We take 4 23
liter food grade pails and put diversol in the first one hot water in the second
citric acid in the third and warm water in the final one. Other than tanks we
use these to clean small items that might be used during each day of the harvest
by simply dipping each item though the four buckets just prior to use. Also at
the end of the day if we are using pumps and hoses we run these four solutions
though all of the equipment, to insure they are cleaned and sanitized for the
next days use. This process is extremely important when you are making wines
that have ML bacteria in them and wines that do not. It is important to clean
and sanitize anything that you do not want ML to happen in. Always process non
ML wines prior to ML wines to prevent any cross- contamination of ML bacteria.
Now that you have all your grapes ordered, all
of your supplies in place, and all of your tanks and equipment clean, and your
lab all set up and clean and all of your last years wines looked after you are
now prepared for your new vintage.
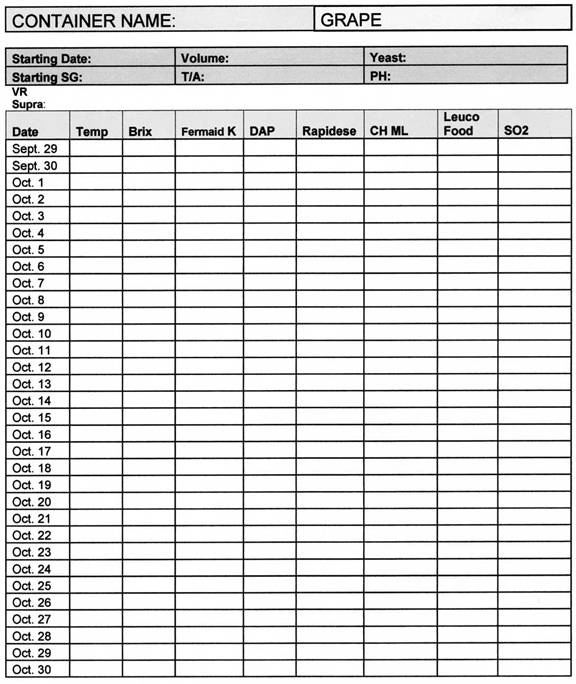
Day 1
Now that your grapes have arrived you must inspect them
prior to crushing. You are looking for any mold, rot, or mildew as well as warm
temperatures; these can all be warning signs of trouble. But hopefully your
grapes look good and are nice and cold. So now you are ready to crush.
You must now decide how many lbs of each
variety will go into each fermenter. I always label my tanks with numbers so
when I start my documentation of the vintage I have accurate reference to each
stage of that grape from this day on. So now you go ahead and crush your grapes
into your tanks. It is at this point I start a fermentation log. Starting with
the crush date the amount of lbs of grapes, the variety, the vineyard and use my
calculation I demonstrated earlier to determine the amount of liters and
hectoliters of wine in that tank. Now with my number of liters in each tank I
can easily calculate, weigh out and make my additions all though out the primary
fermentation process of that grape.
As I mentioned earlier we document the date,
grape variety, weight in lbs or tons, liters and hectoliters as well as the
starting temperature of the grapes when they arrive.
On day one all I usually add is SO2 and my color and
pectic enzyme Rapidese. So if my tank holds 500 lbs of grapes we know that is
now 150 liters or 1.5 hectoliters so we can go ahead and add our SO2 and Enzyme.
I usually add 30 PPM of S02 at crush unless there are some serious problems then
I will add more but usually 30PPM. I have learned a simple and accurate way of
adding KMS (Potassium Metabi-sulphite) in the powder form.
The calculation works like this.
30PPM x 150L
.50
1000 =
Top left number is the desired concentration of SO2 in PPM
Top right number is the amount of liters of wine.
The other two numbers are constants. The first calculation
is to divide 30 by .50 = 60
The second calculation is to divide 150 by 1000 =
.15
So now you multiply 60 x .15 = 9 grams
of KMS to achieve 30 PPM
Now accurately weigh out 9 grams of KMS on your scale.
Now you simply mix in the KMS with some warm
chlorine free or distilled water and stir this into your must.
The second addition I make is the Rapidese
color / pectic enzyme @ 3 GPHL.
1.5 HL of wine x 3 GPHL = 4.5 grams of
Rapidese mixed in with chlorine-free or distilled water and stir this into your
must. Repeat this for all your tanks and record all of the additions you make
and the addition rates you used. At this point I put the lids on and allow the
grapes to macerate overnight. We add S02 to prevent any wild yeast from starting
and the enzyme now starts to break down the skins and start extracting color.
The pectic enzyme also works well for clearing later on after the wine is
finished. We also allow the grapes to sit overnight to start warming them up.
The yeast will start quicker at warmer temperatures. Our grapes usually come in
at around 45 – 50 F or 7 – 10C.
Day 2
First thing in the morning we now add our VR
Supra.
VR Supra is a tannin additive. These highly reactive
tannins bind with anthocyanins in the first 3-4 days of fermentation. If
sufficient indigenous or natural tannins are not present during fermentation the
anthocyanins may precipitate, resulting in color loss. Adding tannin VR Supra at
the start of fermentation (even before indigenous tannins are available)
increases color stability. Using together with enzymes like Color Pro or
Rapidese helps extract more polyphenolics. The ongoing polymerization can
improve the middle palate structure and help significantly reduce or eliminate
vegetal/herbaceous characters. When using tannin VR Supra in conjunction with
enzymes it is best to add the enzymes at the crusher and wait six to eight hours
before adding the tannin. Addition rates are variable and testing is
impractical. Addition rates can be from 20 – 50 GPHL. We choose to add 20 GPHL
as we do get good tannin already from California grapes, but we
think it does help bind up the color. If you are using Okanagan grapes you might
consider a larger addition. This exert is taken from the Scott Labs fermentation
hand book.
So at 20 GPHL 20 x 1.5 = 30 grams of VR Supra.
Simply mix with warm water and stir into the must of each fermenter.
Now we do our lab Analysis.
First thing we measure is Sugar. Ideally I like the sugar
to be around 25-25.5 Brix. Any higher and we begin to struggle with stuck
fermentations. Also choosing a suitable yeast is also important but controlling
the sugar is the most important. If the sugar is below 23 the alcohol might be a
little light so you might consider adding some sugar and if you are above 25.5
in the 26 and above range you might consider adding some Chateau Garden Hose. A
simple calculation for alcohol is Brix x .57 = % alc. EG. 23
Brix x .57 = 13.11 % Alc. 25.5 Brix x .57 = 14.5 % Alc. Even though we choose
yeasts that will tolerate 16 % alcohol sugars above 25.5 can be very difficult
to finish dry. You may choose to use EC 1118 which will tolerate up to 18% + Alc
but that yeast does produce some natural SO2 during fermentation so if you are
doing ML this could slow down or prevent ML from happening.
Next test is PH. I like my PH’s to be in the
3.4 – 3.55 range any higher and I will adjust down with tartaric acid. Because
we are trying to achieve a finished PH after ML is complete of 3.75 or below. I
target 3.70 -3.75. If you start your fermentation in the 3.7 and above range
chances are you will end up with finished PH’s in the 3.9 or 4.0 range depending
on how much malic acid is in the wine. Then you will have to adjust after
fermentation. I prefer to adjust prior to fermentation.
Third test is Titratable Acidity. I like to
have my acids in the 6 – 7 GPL range. If you find that your acid is say 5 GPL it
is a simple calculation. You know how many liters of wine you have and how many
GPL you want to add. One of the complaints I keep hearing about doing titrations
is people have a hard time finding the end point with red wines. I learned a
very accurate way of doing T/A titrations at a Lab class I did at UC Davis in
California
and I will give you the procedure for the test.
Titratable Acidity Procedure.
Equipment
5 ml volumetric pipette
250 ml erhlenmeyer flask
Magnetic stir plate and stirrer
25ml titration burette and clamps
1% phenolphthalein
0.1N NaOH ( Sodium Hydroxide)
0.01 NaOH ( Sodium Hydroxide)
1 liter pyrex glass storage container
Procedure.
De-gas any fermenting wine. Still wine or juice will be
fine.
Boil 600 ml of distilled water pour into 1 liter pyrex
glass container.
Add 10 drops of phenolphthalein, cool to room temperature.
From a dropper bottle add a few drops of
.01N NaOH until a faint pink color is achieved.
You can make up this adjusted water a few days ahead of
time.
Measure 100 ml of adjusted water to 250 ml flask.
Pipette 5ml of juice or wine into the adjusted water.
Fill the 25ml burette with .1N NaOH
Using the magnetic stirrer titrate white to a pink end
point reds to a gray black end point.
Document the amount of NaOH used EG:
4.1 ml
Calculation
Tartaric acid in G/L = (V) (N) (75)
(v)
V = Volume of NaOH used for the titration in ml
N = Normality of NaOH used. .1N used in this test.
V = sample volume of wine ( 5.00 ml
used here)
4.1ml x .1 x 75 divided by 5 = 6.15 GPL
T/A
The nice thing about this procedure is in
finished red wine you’re only adding 5 ml of wine to 100 ml
of water so the color change is easy to see.
Now you have made all your corrections and we
are now ready to add yeast.
The yeasts you should be using should be able to tolerate
the alcohol level which you are trying to achieve. The first year I used 4
different yeasts with different results. If you look at the Scott labs hand book
they give you all the different attributes the yeasts have including alcohol
tolerance, flavor, aroma and mouth feel components as well as compatible yeasts
to blend with later. But one of the most important things I find is the nitrogen
needs. Some are high some moderate some are low. With high nitrogen needs unless
you know your Yan ( Yeast Assimable Nitrogen)
you will be constantly battling H2s during your fermentation and adding
extra DAP and Fermaid K. So we have found that yeasts with moderate to low
nitrogen needs are easier to work with. The two we have used this past year are
ICV D 21 and ICV D 254. D 21 I found to work very well as it has low nitrogen
needs as well seems to achieve higher temperatures during fermentation which
also helps with color extraction.
Now you have chosen your yeast it is time to
inoculate the must.
One of the other interesting things in the Scott labs book
refers to is inoculation rates for yeasts and re-hydration nutrients. The book
refers to sugar levels of grapes that were around 22 Brix and so they
recommended inoculation rates of around 25GPHL of yeast and 30 GPHL of
Go-Ferm. But since then the normal grape sugars have been rising to a
norm of 25 Brix and even higher. So now they recommend inoculation rates of 35
GPHL for yeast and 1.25 times for the Go-Ferm which is 43.75 GPHL. This is to
get your yeast cell count up quicker and promote a healthy fermentation as well
as preventing a stuck fermentation.
Each and every measurement and addition you
make should be documented in your fermentation log for each tank as well as the
date.
Adding the yeast.
First we must re-hydrate the Go-Ferm in 104F
40C chlorine free water at 20 times its weight .
Yeast = 35 GPHL x 1.25 for Go-Ferm =
43.75 GPHL
1.5 HL x 43.75 GPHL = 65.62 Grams of
Go-Ferm x 20 = 1312.5 ml or 1.3 liters of water.
Mix and stir and homogenize. Allow to cool to 100 F or 38
C
Yeast @ 35 GPHL x 1.5 HL = 52.5 grams.
Allow this to re-hydrate into a homogenized slurry.
Now slowly add equal amounts of the juice to the yeast
until you achieve a temperature of no more than ten degrees difference between
your yeast and your tank temperature. Now simply pour the yeast into the tank.
Now we cover up the tank and this is the start of the lag phase of fermentation.
There are four phases of fermentation. The lag phase, growth phase, stationary
phase and the death phase. So we now recover the fermenter and allow the yeast
to start fermenting.
Day 3
Most of us are not capable of testing for Yans although I
know that some of you are. We do not have that capability yet. So we basically
go with the Scott labs recommended nutrient additions as far as timing at
addition rates. We use Fermaid K at an inoculation rate of 25 GPHL. They
recommend you add ½ of the Fermaid K at the end of the lag phase which is 24
hours after the yeast inoculation, and the other ½ at 1/3 sugar depletion. So ½
would be 12.5 GPHL at the end of the lag phase and the other
½ would be if your grapes were at say 25 brix would be 25 divided by 3 x 2 or
about 16 brix for your second addition. So 1.5 HL x 12.5 = 18.75 grams at the
end of lag phase and 18.75 grams at 1/3 sugar depletion or 16 brix. Some people
add DAP at this time as well we tend to wait for any off nose like H2S and then
will add some DAP. At around 10 – 20 GPHL. This is the reason we choose low
nitrogen yeast. We don’t want to add anything unless we have to.
The next part of our documentation that we do
is from day 1 a Temp and Brix check of each tank each morning and document that
on the fermentation log. We like to get our reds up to about 85F or 30C .We find
we get more tannin and color extraction at these higher temperatures. Lower
temperatures will produce fruiter wines but probably not as good a color. This
is why I have recommended D21 yeast to some of the folks buying grapes from the
winery as it does achieve a higher temperature. Having said that if you are
playing with higher temperatures you must have a plan in place to cool if you
get above 87 or 88F because if you get above 93F or 34C you will start to kill
off your yeast and increase the risk of a stuck fermentation. So it is important
to document your temp and brix daily for each tank to insure you don’t go over
your desired temperature and well as when to make your next Fermaid K or
nutrient addition. Usually the smaller fermenters are harder to achieve high
temperatures so many put heaters or heating pads around the fermenters to try to
get the temperatures up. The larger the tank size the higher the temperature.
Once you get to our size our tanks hold 10,000 lbs or 3000 liters you need
glycol cooling jackets on the tanks to insure you can cool in case of high
temperatures.
The next most important thing is pushing down
the caps. Along with temp and brix you should be aerating the wine as much as
possible during the primary fermentation. A simple punch down will not aerate
you need to create lots of air and bubbles 2 -3 times per day. You need to
introduce as much air and oxygen into the wine as you can. We use the pump over
method by spilling the wine into a large tank with a sieve and then pumping it
back over the top to wet the skins. Punching down at this level is not possible.
This is another way of preventing a stuck fermentation good cap management. Now
it is just a matter of temp and brix documenting aeration and
cap management. Make sure each day you smell and taste to insure no signs of
H2S, and if any shows up you must add some DAP and usually that will take care
of the H2S. Once you get below 7 brix you shouldn’t be adding any more Fermaid
or DAP. If your H2S problem persists below 7 brix it is probably not a nitrogen
related problem, and will have to be dealt with aeration or in severe cases with
Copper Sulphate. So now its time to be thinking about when to
press. Of course the longer the wine is on the skins the more heavy body the
wine is going to be. So you must decide when you are going to press. This will
reflect the style of wine you want to make. We at Pacific Breeze try to press
around zero brix. Sometimes this is not possible because of tank availability
and or other fruit coming and we have to make room, but in an ideal world we
like to press at about zero brix. The other decision that you have to make is
whether or not to do a malolactic fermentation. We do malolactic on all of our
wines. I like the way it softens the acids, and gives that nice buttery
character to our Chardonnay, and the nice mouth feel to our reds. But the
biggest reason is for stability. The last thing you need is a malolactic
fermentation in the bottle.
We use Christian Hansen ML culture combined
with Leuco food an ML nutrient. It comes in two different size packages. The
small package will do 250 liters and the large one will do 2500 liters. The
leuco food we add 10 grams per 250 liters. As I mentioned earlier you have to
keep this in the freezer until you are ready to add it. The other thing about it
is that it is such a small amount that you should add it all at once. We just
dissolve the leuco food and ml bacteria in some warm water or wine. For smaller
sized fermenters you need to calculate the volume of wine and how much ML
culture you have and add the appropriate amount of liquid to each tank. For
example if you have two fermenters of 125 liters each just dissolve in some wine
and add equal amounts to each tank. We choose to ML at the end of sugar
fermentation. First the ML culture and the yeast do not have to compete for
nitrogen needs. Second the ML culture likes warm temperatures, low SO2, and
relatively high PH levels. So your wine should still be fairly warm at least
over 70F or 21C most of the SO2 we added will be blown off with the primary
fermentation, and the PH we already know is around 3.5. So we have met the
criteria for a good ML. One of the tricks to doing a good ML is to keep the wine
warm. The other reason to keep it warm is that your sugar fermentation is not
quite finished either. So often I talk to other winemakers that tell me their ML
didn’t happen. Then they tell me the wine is either in a cold garage or outside.
It needs to be kept very warm until it is complete. The other reason I like
Christian Hansen is that it works very quickly. Usually within 3 or 4 weeks it
is done. So now you can either add the ML culture and nutrient to your must or
to the wine in tank after you press. When you press use lots of air and
splashing, this will give more oxygen to the new wine and help finish the sugar
fermentation as well as blow off any odors of H2S if they are present. We press
into large tanks and allow the new wine to stay there for 3-4 days and then we
rack off the heavy lees into new and used barrels.
At this point we are now finished with the
fermentation log and I now start a cellar log. I take each batch by variety and
barrel number and keep track of all the test data such as PH,T/A, R/S SO2
racking dates etc. I have included a copy of the cellar log I use with this
program. Now we keep the wine warm as I mentioned to allow the ML and sugar
fermentations to complete. Another key to a successful Malolactic fermentation
is to know when it is complete. There are a couple of ways but the easiest is
paper chromatography. After about 4 weeks I will take samples from each and
every barrel and start doing chromatography, as well as checking the specific
gravities to monitor the finishing of the sugar fermentation. For the sugar we
use a finishing hydrometer which goes from +5 brix to -5 brix as well as the
clinitest tablets for residual sugar. As I mentioned before I do offer
chromatography services at the winery to those who do not wish to, or do not
know how to do the test.
So now that we have determined that our ML is
complete and our sugar is complete it is time to sulfite. However there are some
critical tests to do now before sulfite can be added. First of all the amount of
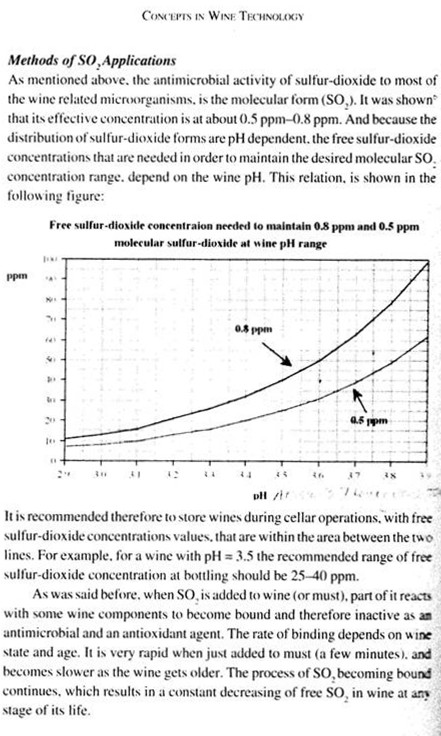
sulfite you add depends on the PH level. The antimicrobial activity of
sulfur-dioxide to most of the wine related microorganisms is the molecular form
(SO2). It was shown that its effective concentration is at about .05-.08
molecular. And because the distribution of sulfur-dioxide forms are PH
dependent, the free sulfur-dioxide concentrations that are needed in order to
maintain the desired molecular SO2 concentration range, depend on the wine PH.
This relation is shown in the following graph I included. It is recommended
therefore to store wines during cellar operations, with free sulfur-dioxide
concentration values, that are within the area between the two lines on the
chart. When SO2 is added to wine (or must), parts of it reacts with some wine
components to become bound and therefore inactive as an antimicrobial and an
antioxidant agent. The rate of binding depends on wine state and age. It is very
rapid when just added to must (as few minutes), and becomes slower as the wine
gets older. The process of SO2 becoming bound continues, which results in a
constant decreasing of free SO2 in wine at any stage of its life. This is an
excerpt from a book called concepts in wine technology.
So we can see by this explanation that the PH
is a very important number when adding SO2 to our finished wine. I like to
finish our wines with PH levels around 3.70 but no higher that 3.75. Another
excerpt from winemaker magazine winemaker Alison Crowe states “Keep PH as low
and acid as high as possible, within intelligent style limits. Bacteria are
repressed by higher acidity and thrive in high PH environments. I like finished
red wines to finish ML fermentation at PH’s no higher that 3.75”
Keeping the PH in the 3.7 or lower range is
not only important for antimicrobial reasons, but also for flavor reasons. Wines
that have PH’s above these numbers tend to be flabby and lifeless. As we can see
from the chart I provided that the SO2 level needed in the cellar at PH 3.7 is
at the low end around 40PPM and at the high end 60 PPM. But if we let our wines
get up around PH 3.9 the low end is around 65 PPM and the high end at 100 PPM.
The problem with this is not only are the wines soft but at this SO2 level we
can smell and taste it as well. My lab professor at
Davis
said that wines with PH’s at 4.0 SO2 becomes almost useless. I like to keep my
SO2’s between 40-45PPM in the barrels. So what happens when we find our finished
PH higher than what we like? We can deal with it in two ways, either by blending
wines in that will reduce the PH or by adding tartaric acid. If you make any
corrections be sure to do them in the lab on a small scale and test them to see
what the final result will be. Once you are happy with the correction go ahead
and do it in the cellar. Now re-check your PH and T/A. This should hopefully be
your last correction to this wine as far as PH adjustment. The only time it will
change now is if you store it in a cold environment and some bi-tartrates fall
out. Now with the chart provided and the formula I gave you earlier you can add
the proper amount of SO2. So now we sulfite our barrels and wait until mid
January and do our first racking. Most of you will probably rack from container
to container. We do a rack and return. Rack all of the barrels to a single tank.
Re-test PH and SO2, top up accordingly and clean the barrels and refill them. We
also label each barrel with a number, year the barrel was new, the wine that is
in the barrel, is it ML+ does it have SO2 and the last date it was racked.
Now just because you have added 40PPM SO2
today to your barrel or tank don’t think it is going to be 40 PPM 2 months from
now. During all of the fermentation air was your friend. Now it’s the enemy. Air
space in barrels in tanks can be deadly to finished wine. So barrel, and tank
topping is paramount. It will depend on the humidity of your cellar as well as
the temperature change. I have to top barrels in the winery every two weeks and
I loose about ½ liter per barrel. And at 208 barrels the angels above
New Westminster must be smashed most of the time. So many
times I visit other winemaker’s cellars and I see big air spaces in carboys, and
I tell them this can be trouble. So please keep all of your barrels and carboy’s
topped up at least every two weeks. I also test all of my S02’s every couple of
months as necessary.
So now for the next 5 – 6 months we just top
and test. I usually keep a small tank of white and a small tank of red for
topping up. Each with variable floating lids.
From January to June is when we start bottling
all of the previous vintage wines. When we decide to bottle we again rack the
wines to a clean tank. We do two pre-filters 5.0 micron and .45 nominal micron
into another clean tank. SO2, PH T/A are given a final check and topped if
necessary and now the wine is ready to bottle. Our bottling truck comes to the
winery and he puts the wine though a final pre-filter of .45 nominal and then
the .45 absolute micron sterile filter and then directly into the bottle. Why do
we filter you say? Well as much as we take as many precautions as possible we
think the sterile filter is a safety net in case we have missed something. When
you are making 3000 cases of wine we cannot afford to uncork all that wine to
fix a mistake.
So now in early July we start doing lab trials
of blends that we might like. We put together different bottles and invite our
colleagues to taste and evaluate. We put together a blending schedule and the
second rack and blend takes place in late July and early August. Numbers are
reassessed PH’s SO2 and T/A are rechecked and the blends are made and racked
back to the barrels.
We like to blend and then re-barrel to allow the blend to marry for the next 5
-6 months to see if we really still like it or if we can adjust it in some way.
So now we have come full circle to where we started. Planning the next vintage.
Again I would like to thank you for having me
speak today and I hope each and every one of you can at least take something
home from this program.
Cheers Dan Jones………
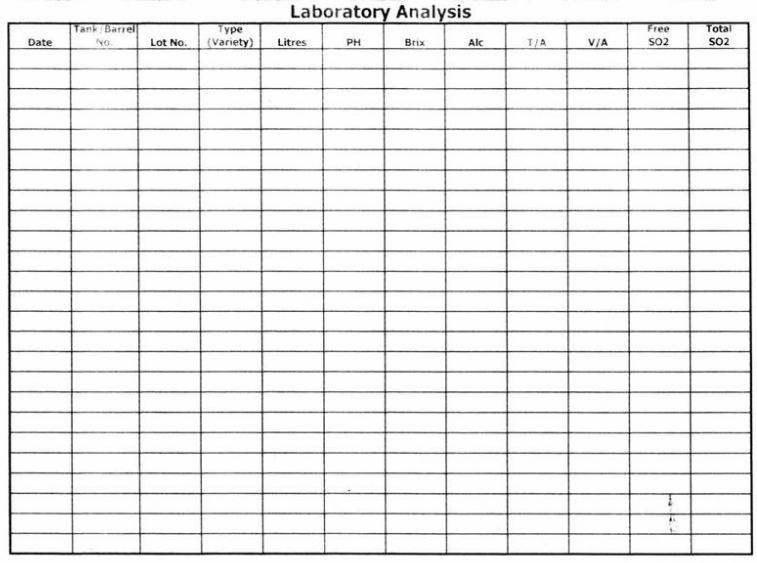
Laboratory Analysis Chart
 Click to enlarge
Additives, Fining Agents and Processing aids
 Click
to enlarge
Click
to enlarge
 Click to enlarge
 Click
to enlarge
Click
to enlarge